| Step | | Procedure & Parts & Tools |
| 1 |

|
REMOVE THE 3 BOLTS HOLDING POWER BOARD TO MACHINE. NOTE: TURN THE MACHINE OFF.
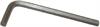
| Wrench-Allen metric 6.0mm |
|
|
| 2 |
|
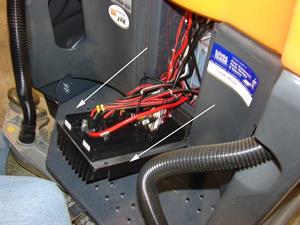
LAY THE POWER BOARD ON STEP BOARD.
|
| 3 |

|
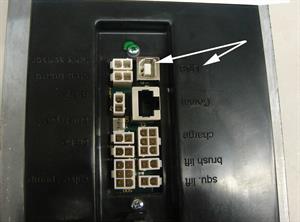
LOCATE THE PORT ON THE POWER BOARD LABELED USB. PLUG THE USB CABLE INTO THE LAPTOP FIRST AND THEN INTO THE POWER BOARD. NOTE: PLUGGING INTO THE POWER BOARD FIRST MAY CAUSE DAMAGE TO THE POWER BOARD.
|
| 4 |

|
http://www.usaclean.com/dropbox/archive/350XP.zip
http://www.usaclean.com/dropbox/archive/Firmware.zip
http://www.usaclean.com/dropbox/archive/ServiceTool.zip
NOTE: IF YOU ARE USING WINDOWS XP-GO TO STEP 5. IF YOU ARE USING WINDOWS 7-GO TO STEP 6.
|
| 5 |

|
Follow these steps to access the software:
The computer won’t know how to make a usb connection to the machine
This has nothing to do with the firmware files or the service tool at this point
You will see a Found New Hardware window
This must be successfully completed before proceeding, or nothing will work
Tell it you do not want to search Windows Update for a driver
There should be a box on that screen where you can tell it where you want to search for drivers to install
Note: this isn’t the “don’t install automatically, I will choose option at the very bottom
Hit browse
Find the USB_Driver_Swingo_350B_XP folder & select it, you don’t have to go down any further folder levels than that
Hit Next
It will tell you that the driver hasn’t been signed by Microsoft, etc. etc. – that’s fine
Once it installs, you should see a popup at the bottom that says your new hardware was installed successfully and is ready to use. Proceed to step 6.
|
| 6 |

|
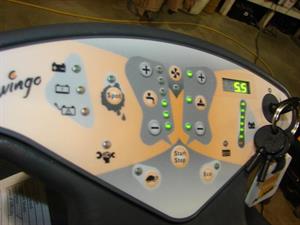
TURN THE KEY ON THE MACHINE TO THE START POSITION. NOTE: DO THIS BEFORE GOING ANY FURTHER WITH THE SOFTWARE. IF THE MACHINE IS NOT TURNED ON, THE SOFTWARE WILL SAY MACHINE NOT FOUND.
|
| 7 |

|
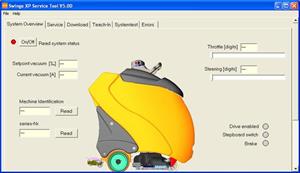
OPEN THE TASKI SERVICE TOOL AND DOUBLE CLICK THE XP PICTURE.
|
| 8 |

|
NOTICE THE RED DOT ON THIS SCREEN. CLICK CONNECT AT THE BOTTOM OF THIS SCREEN.
|
| 9 |
|
WHEN MACHINE IS CONNECTED, THE RED DOT WILL NOW TURN GREEN. NOTE: VERY IMPORTANT! WHEN THE SERVICE TOOL IS READING THE MACHINE, DO NOT DISCONNECT THE LAPTOP OR TURN THE MACHINE OFF, THIS MAY RESULT IN DAMAGE TO THE POWER BOARD.
|
| 10 |
|
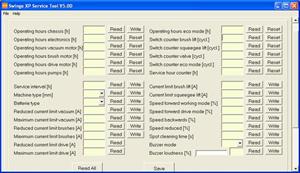
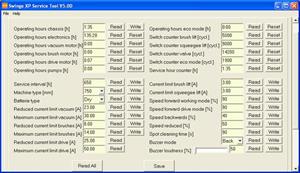
CLICK THE SERVICE TAB. NOTE: ITS OK TO CLICK THIS TAB ANYTIME, THIS WILL NOT CAUSE ANY DAMAGE TO THE POWER BOARD.
|
| 11 |
|
CLICK THE READ ALL BUTTON. THE SOFTWARE WILL AUTOMATICALLY POPULATE THE DATA.
|
| 12 |
|
CHANGE THE OPERATING CHASSIS HOURS TO 1 AND CLICK ON THE RESET BUTTON ON ALL THE OTHER SELECTIONS.
|
| 13 |

|
THE SOFTWARE WILL RESET ALL SELECTIONS TO ZERO. CLICK SAVE. NOTE: YOU WILL HAVE TO RESTART THE PROCESS IF YOU CLOSE WITHOUT SAVING.
|
| 14 |
|
NOTE: DO NOT DISCONNECT THE LAPTOP UNTIL YOU TURN THE KEY OFF ON THE MACHINE. DISCONNECTING FIRST MAY CAUSE DAMAGE TO THE POWER BOARD.
|
| 15 |
|
DISCONNECT THE USB CABLE FROM THE LAPTOP AND THEN FROM THE POWER BOARD.
|
| 16 |

|
REVERSE STEPS 1 AND 2 TO REINSTALL THE POWER BOARD.
|